
转载声明:文章来源:https://blog.csdn.net/qq_40065776/article/details/130275209
1、增加 maven 依赖
<!-- SpringCloud Alibaba Nacos Config -->
<dependency>
    <groupId>com.alibaba.cloud</groupId>
    <artifactId>spring-cloud-starter-alibaba-nacos-config</artifactId>
</dependency>
2、添加配置中心配置
spring:
  application:
    # 应用名称
    name: cloud-gateway
  profiles:
    active: dev
  cloud:
    nacos:
      username: nacos
      password: nacos
      discovery:
        # 注册中心地址
        server-addr: 127.0.0.1:8848
        namespace: 482e3612-4bf5-4d77-96ef-e963c6e7a4bb
      config:
        # 配置中心地址
        server-addr: 127.0.0.1:8848
        namespace: 482e3612-4bf5-4d77-96ef-e963c6e7a4bb
        # 配置文件格式
        file-extension: yml
我们的微服务默认会加载配置文件:
${spring.application.name}-${spring.profiles.active}.${spring.cloud.nacos.config.file-extension}以此配置为例,也就是会默认加载如下配置文件:

3、Nacos 添加配置文件
【服务列表】->【dev】->【创建配置】

由于我们微服务中配置的是以 .yml 为后缀的文件,所以我们要选择 YAML 格式的文件
4、获取配置参数
package com.biz.controller;

import org.springframework.beans.factory.annotation.Value;
import org.springframework.cloud.context.config.annotation.RefreshScope;
import org.springframework.web.bind.annotation.GetMapping;
import org.springframework.web.bind.annotation.RestController;

@RestController
public class TestController {

    @Value(value = "${test:unknow}")
    private String name;

    @GetMapping("test")
    public String test() {
        return name;
    }
}
启动项目,访问接口
http://localhost:8080/test得到如图所示

5、自动刷新
上述我们成功获取了 nacos 里面的配置内容,但是我们如果修改了配置内容,我们的微服务获取到的内容是不变的,不会自动刷新,只能重新启动服务才能获取最新的配置参数,所以我们需要配置自动刷新操作
1、@RefreshScope 注解
package com.biz.controller;

import org.springframework.beans.factory.annotation.Value;
import org.springframework.cloud.context.config.annotation.RefreshScope;
import org.springframework.web.bind.annotation.GetMapping;
import org.springframework.web.bind.annotation.RestController;

@RestController
@RefreshScope
public class TestController {

    @Value(value = "${test:unknow}")
    private String name;

    @GetMapping("test")
    public String test() {
        return name;
    }
}
我们加了 @RefreshScope 表示局部刷新,在此类中获取的 nacos 配置内容会自动刷新
2、配置文件设置 refresh: true
spring:
application:
# 应用名称
name: cloud-gateway
profiles:
active: dev
cloud:
nacos:
username: nacos
password: nacos
discovery:
# 注册中心地址
server-addr: 127.0.0.1:8848
namespace: 482e3612-4bf5-4d77-96ef-e963c6e7a4bb
config:
# 配置中心地址
server-addr: 127.0.0.1:8848
namespace: 482e3612-4bf5-4d77-96ef-e963c6e7a4bb
# 配置文件格式
file-extension: yml
# 共享配置
shared-configs:
- dataId: common-${spring.profiles.active}.${spring.cloud.nacos.config.file-extension}
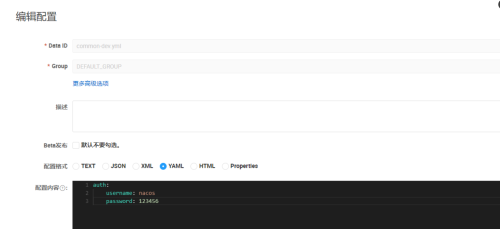
refresh: true我们引入了配置文件 common-dev.yml,然后创建配置类来接收配置内容
package com.biz.controller;

import lombok.Data;
import org.springframework.boot.context.properties.ConfigurationProperties;
import org.springframework.stereotype.Component;

@Data
@Component
@ConfigurationProperties(prefix = "auth")
public class AuthProperties {

    private String username;

    private String password;
}
nacos 创建配置文件 common-dev.yml:
获取参数输出:
package com.biz.controller;

import org.springframework.beans.factory.annotation.Autowired;
import org.springframework.web.bind.annotation.GetMapping;
import org.springframework.web.bind.annotation.RestController;

@RestController
public class TestController {

    @Autowired
    private AuthProperties authProperties;


    @GetMapping("test")
    public AuthProperties test() {
        return authProperties;
    }
}
启动项目,访问接口:
http://localhost:8080/test得到如图所示:

修改 nacos 配置文件内容:

再次访问接口,得到如下:

说明我们配置的自动刷新成功了


帖子还没人回复快来抢沙发